Another way of creating a simple mathematics equation without using the
Math Equation of Microsoft Word is using
superscript and
subscript. These two amazing features can be used specially by students creating a thesis or reports that needs simple equation or format. But if it requires a lot of superscript and subscript i recommend using the math equation instead for an efficient and faster way of completing the projects. Content of this blog, i will show how to do it using toolbars and short-cut keys using the keyboard that can lessen the time and mouse-stroke to create superscript and subscript format. So, let's start and discuss first the process using toolbars afterwards, short-cut keys.
Note:
I used Microsoft Word 2003 but this step can be also done using higher version.
Please note: Microsoft Word application should be running to follow the steps provided.
1. Type X2 + Y2 = 0 on Microsoft Word. See below:
2. Using mouse highlight the number "2" of X by holding left-click then drag.
3. Then, click
Format -->
Font to open
Font window.
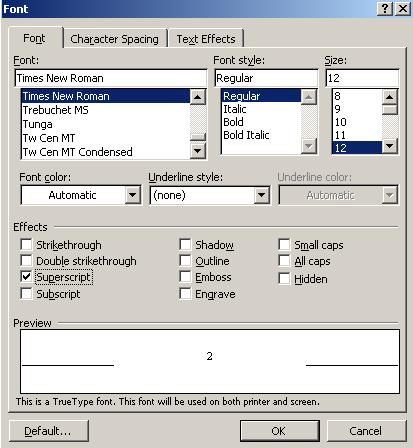
4. Once
Font window appear, under
Effects check
Superscript. Observe the preview screen result.
5. Then click OK, number 2 on the X side will be converted to superscript. See below:
6. If subscript is required, follow procedure 1 to 3, then for step 4 instead of checking superscript select
subscript.
SuperScript and Subscript using Short-Cut Keys (Keyboard)
1. Hightlight the value that will be converted to superscript.
2. Once highlighted, press simultaneously
Ctrl + Shift + +/= (left side key of backspace).
3. Highlighted value converted to superscript.
4. For subscript, once desired value highlighted to be converted to subscript, press simultaneously
Ctrl + _/- (underscore/minus, keys on the left side portion of (+/=), second key to the left of backspace).