Tuesday, September 3, 2013

Traded-in New Car with Used Old Car?

Out of curiosity, what will be the effect if someone just recently bought a new car and after a few months let's say 6 months planned to sell it and just buy a used old car?
 
I will need your thoughts about this, will this approach just to save more money instead of paying high car monthly mortgage won't really affect one's person credit points if that person traded-in its new car with used old car? On my own thought I guess not because the remaining car mortgage balance will be paid off by the used old car finance bank, if the bank agreed to finance used car or if its finance value reaches the bank's minimum amount which usually at least equal or above $7,000.00.


Monday, October 4, 2010

MS Office Excel 2007 Insert and Quick Style Table

Compared to MS Office Excel of previous version, the Excel 2007 have numerous improvements and quick easy access of its controls. On this blog, we will talk about how to insert a table and customizing its design/style for a more acceptable and professional design that can be used by students on their presentation or on a business to present a professional look styles and design. Learning features such as this can surely reduce the amount of time required to create different looks of a table. So, let's start one of the steps we can learn to start creating a professional look table.

Note: MS Office Excel 2007 should be running when following the steps provided.

1) Open any existing excel table or data that stored on your computer or create one for training purposes.
See sample illustration below:


2) Highlight the whole table containing data.


3) For a more quick access, we will name this table using the name box to name our table, in this case we will name it as "customer_info". To know the location of name box look at the illustration below:


4) After highlighting data and giving our table a name, go to Insert --> Table. See illustration below:


5) A window will pop-up and showing the range selected. Since our table have its header (title for each column) click on it, then select OK.


6) After clicking OK, existing table will change its looks based on the default style/design of office Excel 2007 and a Filter functions will be added on the header.


7) Now, let's try to modify/customize the style to a different one. To do this, on the right portion of the toolbar click the Quick Styles to select from the library the choice of table style you desire.


This is the library:


From the library we will select the one in red box.

8) After selecting the style desired, it will be applied on the table.


9) That's all. Enjoy.

Microsoft Office Excel 2007 Display Macros Tab, Visual Basic Tab

MS Office Excel 2007 is a really unique and new user interface compared to previous release of Office Excel. Familiarizing first with this controls will absolutely help users to work faster in creating tabulated report or even an automated macro or using visual basic editor to create simple to complex working sheet/ forms. But with Excel 2007, accessing the Developer tab (tab to access visual basic, macro controls) as a default is not shown. For it to be shown together and align with the Home, Insert, Page Layout, Formulas toolbar control a few steps have to be followed. Let's start:

Note: MS Office Excel 2007 should be running before following the procedure/steps numbered below:

1) With the MS Office Excel 2007 running, click the office button as shown in the image below:

2)  After clicking, a window will appear, select and then click Excel Options.


3) Once Excel Options opened, under Popular --> select and checked "Show Developer tab in the Ribbon" --> then click OK.

4) After clicking OK, "Developer" tab should be shown in line with Home, Insert, Page Layout etc. (see illustration below). Try to click on it and menus for Visual Basic, Macros, Source, Import will be shown.

Tuesday, September 7, 2010

msExcel 2003 - Center Title using merge button

One of the best benefits of using msExcel for students, company or any other projects is its easy to create a good looking presentation. On this blog, i just tackle one of the basic button MERGE available as button of the toolbar. Its primary purpose is to combine selected cells into one. This button with a very simple functions of merging cells into one can be use to create a good looking presentation and neat data tabulation. So, let's talk and follow the short and simple steps i have provided below:

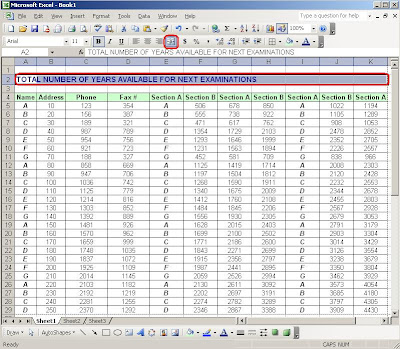
1) Highlight the title or text that you've wanted to be centered or contained into one cell. For example, below title was type in column A and aligned on the left side of the table. Highlight it to select column A to Column K.


2) Once highlighted, click on Merge button as shown below:


3) After clicking Merge button, result will be the same as shown below. Notice that columns A to K after merging has been combine as one whole cell.

Set Windows XP IP Address to Obtain address automatically

Internet Protocol address (IP address) are sets of numbers assigned to a computer or devices participating in a network. This unique sets of numbers used by computer make them able to share files, communicate and connect to internet to share information, download and upload files. Sometimes, when connecting to internet makes it difficult or there's a problem in the connection by Resetting it to its Default values can help to resolve the problem. On this blog, we will talk how to reset IP address to its Default value so that network will determine automatically what IP address it can used and available.

Below are just one of the solutions available we can set IP address to obtain automatically its address.

Let's Start:

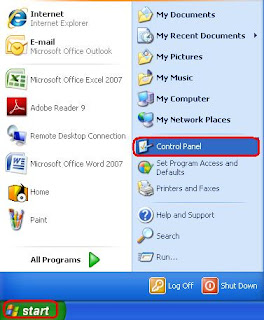
1) Click on Start --> Control Panel as shown below.


2) Once Control Panel window opens, click on Network and Internet Connections.
(Below view is in Category View)


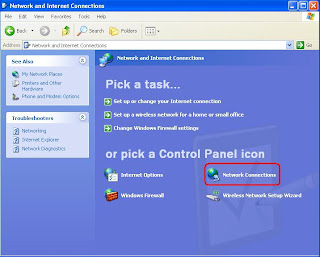
3) Network and Internet Connections window will open, click on Network Connections.


4) Once window for Network Connections open, right-click on Local Area Connection --> Properties.


5) Under General tab, select Internet Protocol (TCP/IP) --> and click on Properties.


6) Window for Internet Protocol (TCP/IP) Properties will open, below it select Obtain an IP address automatically and make sure that Obtain DNS server address automatically will also be selected then clicked Ok.
Notice that as shown below Use the following IP address and Use the following DNS server addresses are selected and a value is set, once obtain an IP address is set to automatic those box portion will be blank or no value.


7) After clicking OK, box portion will be blanked as shown below.


8) Its Finished. Restart you computer and try to connect to internet.

Monday, August 30, 2010

Insert Row x Column in Excel

Let's have some example on how to insert row and column to an existing worksheet with data. Specially for beginners inserting a row or column in an existing worksheet sometimes inserted it in a wrong position, deleting existing data. To avoid this little accident, we will discuss how to do it and what should we clicked properly.

Note:
I used Microsoft Excel 2003, but below steps can also be done with Excel of higher version.
Author suggests that the application MSExcel is running before going thru series of steps.

1. Identify where will the data be inserted. (i.e. as an example we will be inserting row information between Row 7 and Row 8).


2. Left-click row number 8 to select it. (notice that whole row number 8 is highlighted)


3. After row number 8 was selected, press right-click on mouse and a menu will be displayed as shown below. Select Insert to insert a row on top of H and below F.


4. After left-clicking Insert, a new row has been created and data can now be pasted/type-in.


NOTE:
To create a column instead of left-clicking row number select column letter and follow procedure 3-4 to insert a column.

Microsoft Word SuperScript & Subscript

Another way of creating a simple mathematics equation without using the Math Equation of Microsoft Word is using superscript and subscript. These two amazing features can be used specially by students creating a thesis or reports that needs simple equation or format. But if it requires a lot of superscript and subscript i recommend using the math equation instead for an efficient and faster way of completing the projects. Content of this blog, i will show how to do it using toolbars and short-cut keys using the keyboard that can lessen the time and mouse-stroke to create superscript and subscript format. So, let's start and discuss first the process using toolbars afterwards, short-cut keys.

Note:
I used Microsoft Word 2003 but this step can be also done using higher version.


Please note: Microsoft Word application should be running to follow the steps provided.
 
1. Type X2 + Y2 = 0 on Microsoft Word. See below:


2. Using mouse highlight the number "2" of X by holding left-click then drag.


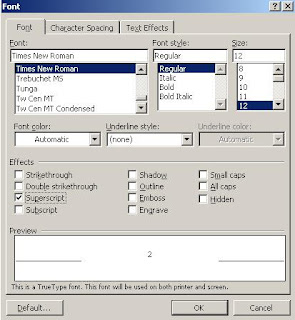
3. Then, click Format --> Font to open Font window.


4. Once Font window appear, under Effects check Superscript. Observe the preview screen result.


5. Then click OK, number 2 on the X side will be converted to superscript. See below:


6. If subscript is required, follow procedure 1 to 3, then for step 4 instead of checking superscript select subscript.
 
SuperScript and Subscript using Short-Cut Keys (Keyboard)
 
1. Hightlight the value that will be converted to superscript.
 
2. Once highlighted, press simultaneously Ctrl + Shift +  +/= (left side key of backspace).
 
3. Highlighted value converted to superscript.
 
4. For subscript, once desired value highlighted to be converted to subscript, press simultaneously Ctrl +  _/- (underscore/minus, keys on the left side portion of (+/=), second key to the left of backspace).

Traded-in New Car with Used Old Car? Out of curiosity, what will be the effect if someone just recently bought a new car and after a few...